Friday, February 20, 2009

Tip: Organizing Your Scripts & Adding Quick Links

Difficulty: Beginner - Intermediate

This is not a tutorial on scripting, but rather some helpful tips to speed up the process.

Here are a few helpful tips when creating Scripts in any Program.

1. Find a good editor!

I can't emphasize this point enough! When you pick up a good editor (like MEL Studio for Maya, found for free at www.digimation.com), you will cut down the amount of time you spend debugging. Note the emphasis on the word "good". You are looking for an editor that will recognize & color code different parts of your script. It is especially nice when one of those colors represents incomplete parts of your script, because a lot of errors have to do with incorrect syntax (such as forgetting to end with a semi-colon, or forgetting to put something in quotes).

Having a program that can help you recognize these errors quickly will really help you in writing them.

2. Add Headers to your file.

In Fig. 1, the green words are an example of a header. Headers are great for a couple of reasons:

1. They break up your script. When you start getting into hundreds and thousands of lines of code, it's nice to have key words/phrases that you can pick out to move from section to section.
2. Instructions can be placed in them. You can leave installation or execution instructions in the header to help yourself and others utilize the full potential of a script.
3. You can add reminders into them. When I'm writing a script, I like to put a "to do" list of sorts at the top to remind myself what I have written, what needs to be written, and I also record that last thing that I completed or the next thing I need to work on so that I can jump back into writing when I open the file again.

I write headers throughout my script to explain what the following section is meant to accomplish. This also helps when you are following the next tip because you can write out the entire script in psuedo-code and use the headers as benchmarks in the progression of the code.
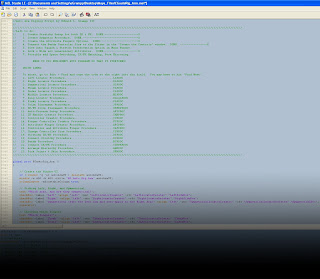

Fig. 1: An example header for a MEL script. This was made with MEL Studio LE.
*Note* As any experienced scripter will know, always make sure that your headers are commented out (most commonly done by "//" or "/*" types in most languages).

3. Write out the process in plain english (or whatever language) first.

This is helpful before jumping into code because you may discover a more efficient way of writing a function or procedure in the process. It helps you to think about what you are trying to accomplish on a basic level. It also makes it easier to write because all you have to do is translate the sentence from your native languague to the scripting language.

For example, let's say you wanted to write a script to do the following:

Take the average of two numbers and apply it to the twist rotation of the arm.


I can easily look at this sentence and translate it into this:

armTwist.rotateX = (firstNumber + secondNumber)/2;


I can also leave the plain English in my script (but commented out of course) to help remind me what the code below it aims to do. So my final script would look like this:

//Take the average of two numbers and apply it to the twist rotation of the arm.
armTwist.rotateX = (firstNumber + secondNumber)/2;


4. Debug as you write.

One of the worst mistakes you can make is to write huge chunks of code at one time without debugging them. The more you write at once, the more errors you are likely to have. Debugging gets really complicated when errors start working together to give new errors that you're unfamiliar with. I will usually write until I have reached a point where I can execute the script and get visual results. For me, this is no more than 4 or 5 lines of code before I start checking what I have written.

5. Add Quick Links to move through your script.

This idea occurred to me while I was reading a Walkthrough for a video game online. (as a side note, I am not a fan of using walkthroughs unless I've beaten a game first. However, since entering my career I will shamefully admit that I have started using them because I just don't have as much time as I used to).

Many of these Walkthroughs have a table of contents listed at the top in order to access particular sections of the document quickly. In order to use them, you hit Ctrl + F in your browser to bring up the "Find" command, and then type in (or copy and paste) a unique code to jump to a specific part. As I was using one of these quick links I thought to myself, why haven't I been doing this in my MEL scripts?

I have found that creating Quick Links really helps me to make sure that I'm in the right section. Go back to Fig. 1 and look at the Table of Contents for the script. You should see a long list of Quick Links. You will need to write cooresponding lines of code further down in your script, such as in Fig. 2.


Fig. 2: The Quick Link that will be found after entering it into the Find Box.

It is best to write these while you are writing your script as opposed to when you are finished so that you can use the Quick Links during the creation of the script as well.

These are also helpful when revisiting a script, as you can find inefficient lines of code quickly and update them.

So, there you have it! Hopefully these tips will help you to create faster and more efficient scripts! Now get cracking and write the next great plug-in!

Monday, February 16, 2009

Tutorial: The Easiest Auto-Forearm Setup

Difficulty: Beginner

There are many auto-forearm setups out there, and I think that many have become overcomplicated. A lot of them work as expected, but as a Character TD you are concerned with efficiency and this method of rigging an auto-forearm is the lightest method I have seen out there. The only thing that will drive it is a single Orient Constraint... That's it!

The method will work for any type of arm Setup and will be integrated seamlessly into IK/FK, Stretchy, Bendy (a.k.a. Extra Deformation Controls). If you are using the 3-chain IK/FK switch, you should note that this setup will only need to be applied to the "real" joint chain (the one that you bind the skin to). It's also good for Game engines because of it's fast computation.

For me, the real beauty of this method is that it doesn't require us to change the end effector of IK Handles! We can simply draw the IK from the shoulder to the wrist because our Forearm will not break up the joint chain.

Without further explanation, let's get started!

Step 1: Draw the Arm Joints

You will only need to draw the following joints: Clavicle, Elbow, Wrist (you can also draw the hand & fingers if you wish). Note that we skip the Forearm joint in the creation of the initial joint chain. (See Fig. 1)


Fig. 1 : All the Joints.

Before you proceed, make sure that all your rotations are correct. If you don't know how to do this properly, you probably shouldn't be messing with them so I won't go into details in this tutorial.

Step 2: Create the Forearm Joint

Let's create the Forearm Joint now! This is done by simply by selecting the Elbow joint and Hitting Ctrl + D to duplicate it. Rename this new joint (Elbow1) to Forearm in the Channel Box. We are doing this for 1 important reason; Our Forearm will have the exact same orientation as our Elbow joint, which makes sure it is pointing towards the wrist as well. (See Fig. 2)


Fig. 2: The Forearm joint with the copied hierarchy under it still.

Open up your outliner. Select the next joint under Forearm (it will be a copy of the wrist joint) and Delete it. You are now left with only the Forearm joint and it should be parented under the Shoulder. (See Fig. 3)


Fig. 3: The Hierarchy in the Outliner.

Step 3: Positioning the Forearm Joint

We want to position the Forearm between the Elbow and Wrist joints now. The 2 most popular spots that I've seen it placed is either halfway between the Elbow and Wrist, or 3/4 away from the Wrist (so closer to the Elbow Joint). Here's how you can do either.

Select the following joints in this order: Elbow, Wrist, Forearm. We are going to perform a Point Constraint to figure out the distance between them. Before doing that, make sure that "Maintain Offset" is unchecked in the options box, then hit the "Add" button. This will by default place this joint exactly between the Elbow and Wrist Joints. If you want to change this position to 3/4s, go to the Channel Box and look for the "Forarm_pointConstraint1" node. There are 2 boxes at the end of this node labled "Elbow W0" and "Wrist W1". Change "Elbow W0" to .75, and "Wrist W1" to .25 . Essentially all we have done is adjust the weight to be 75% allocated to the Elbow and 25% allocated to the Wrist. This ends up giving us the 3/4 (or 75% if you know your fractions :) ) distance. (See Fig. 4a & 4b)


Fig. 4a: The Point Constraint Options Box settings.


Fig. 4b: The Constraint Weights in the Channel Box.

In your outliner, select the "Forearm_pointConstraint1" node and delete it.

Alternately, you could skip the Point Constraint Process and use the Move tool to place the Forearm into position. Make sure you double click the Move tool and choose "Object" under the Move Axis. The select the Forearm joint and pull on the axis that is pointing down the bone (the X axis a.k.a. Red arrow is Maya's default).

Step 4: Creating the Connections

Now that the Forearm is placed, parent it to the Elbow by selecting the Forearm followed by the Elbow and hitting "p" on your keyboard.

Next, select the Elbow Joint, then the Wrist Joint, and Finally the Forearm Joint and perform an Orient Constraint with the following Options: Maintain offset is Checked, and then under Constraint axes check only the twist Axis (this is the axis that points down the bone in the move tool. If you are using the Maya Defaults, then that will be the X axis). (See Fig. 5)


Fig. 5: The Orient Constraint Options box settings.

If your Forearm Joint is exactly between the other 2 joints, then you are done! If not, then you will need to adjust the Constraint Weight to get the desired result. This is done exactly the same as we did earlier to position the joint using the point constraint. If you did the 3/4 weight, then you will adjust the "Elbow W0" attribute to be .75 and the "Wrist W1" attribute to be .25 just like before. If you eyeballed the position of the Forearm joint using the move tool, then you'll have to guess on the numbers (if it's closer to the wrist joint, give the Wrist W1 weight more of the percentage. If it's closer to the Elbow, give the Elbow W1 weight more of the percentage. ALWAYS try to get it so that when both numbers are added you get a result of 1).

What we have just done is told the Forearm joint to rotate in a specific range. Since the twist Attribute of our Elbow joint should never change from 0, the expected twist should be equal to a percentage of the rotation of the Wrist (again, this is determined by the weight). Let's say that the weight of the wrist is at .5 (50%). When I rotate the wrist 20 degrees, the Forearm will rotate 50% of that and rotate to 10. When I rotate -30 degrees, I get -15, etc. If I had .25 weight to the wrist (the Forearm is closer to the elbow, in other words), I could rotate the wrist 20 degrees and the Forearm would rotate 5 degrees (20 * .25 = 5).

On a side note, by default the 2 weight values are both set to 1. This is done because most of the time an orient constraint is done by 2 objects instead of the 3 in our case. By setting the weight values of each of these to the same number, you will get a result of .50 weight for each (or 50% influence from each object).

See, that wasn't too bad! While this setup is not Gimbalproof, it will be safe within normal ranges of motion for the arm.


Fig. 6: The finished setup and the Hierarchy.

Now all that's left is to bind the skeleton to your mesh and paint the weights.